Sunday, April 23, 2017

Installing and setting Java path


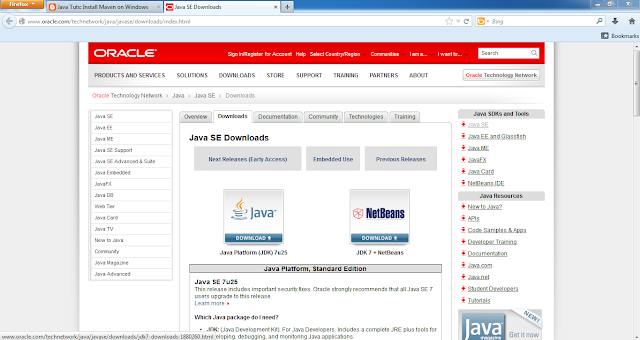
Download Java
Download lastest release of java form the official site
http://www.oracle.com/technetwork/java/javase/downloads/index.html
 Install the downloaded file
The file is installed into follwing location C:\Program Files\Java
Then, right click on mycomputer


 -> click properties -> the follwing screen will be displayed


 Now, click on Advance System Setting, screen below appears


 Click on Envirnment Variables, another window is displayed


 Click New button below the upper box and secreen below will be displayed

Insert following into corrosponding textbox
Variable name: JAVA_HOME
Variable Value: C:\Program Files\Java\jdk1.7.0_07


In lower box select Path and click Edit button, at the end after “;” paste full path to bin folder (Note :- keep other content in box as it is and end the line with “;”)
Variable Value: C:\Program Files\Java\jdk1.7.0_07\bin;


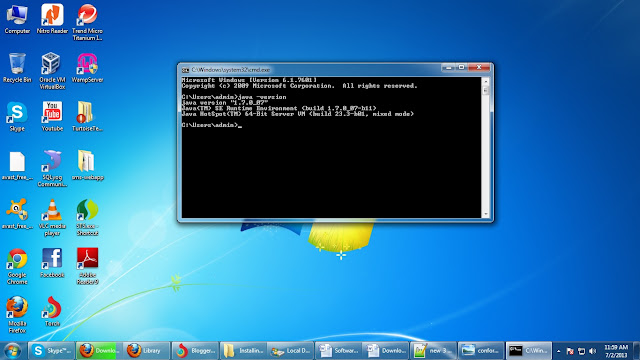
Now, after all this process check that Java installation and setting is successfully completed
Open command  and run follwing syntax
C:\Java -version and you will see screen below if all the setting are correct


Check code quality with PMD

Integrating PMD plugin on STS (subclipse) /Eclipse

1. Open STS  -> click on Help


2. Click ->Install New software


3. Click Add Button and screen blow is dispalyed
Name : PMDplugin
Location: http://sourceforge.net/projects/pmd/files/pmd-eclipse/update-site/

4. Check on PMD for Eclipse 3.

5. Click -> Next

6. Agree the agreement and click -> Finish


7. Wait for Eclipse to download the required jar files, then click Install
8. Restart the workbench. This will load the PMD plugin.
9. Navigate to Window | Show View | Other...

10. Select PMD |select -> Violations overview


Opearating  PMD in STS  (How to usePMD)
1. In the Package Explorer right-click on Project and select PMD | Check Code With PMD

2. PMD Violations view notice a list of violations


Installing TortoiseSVN and integrating with STS


Install TortoiseSVN

1. Download TortoiseSVN from following link ( download the latest stable release of TortoiseSVN)
http://tortoisesvn.net/downloads.html


1. Click and run the downloaded file, continue the installation process


Using TortoiseSVN client on Windows

Verifying Installation:
In order to verify the successful installation of the Tortoise SVN client right click on any folder and you can see the TORTOISE SVN TASKS as shown below:


Check out from SVN Repository:
Step1: create the folder where you want to check out the files/folder from SVN server repository.
Step2: right click the folder and click on SVN Checkout. Now you can see the screen like Figure 1.

Figure 1: SVN Check out screen
Step 3: In above picture Figure 1. URL is the SVN server repository url to access the files and the Checkout directory is the directory where you are going to download (checkout) the files. After specifying the url and directory click OK.
Step4: After step 3 you may be asked for your SVN username and password. Enter the valid username and password and proceed.
Step 4: now you can see the files checkout from the SVN server repository as shown below figure 2

Figure 2: checkout from svn screen

Configuring TortoiseSVN
TortoiseSVN generally requires no configuration. To access a repository, a checkout operation should be performed. Right-click in the directory to perform the checkout, and select 'SVN Checkout' from the menu. Then, access the repository via URL, similar to how a web-browser operates. This URL will look like:
https://PROJECTNAME.svn.sourceforge.net/svnroot/PROJECTNAME
Though, typically you would want to specify the trunk to be checked out. Like this:
https://PROJECTNAME.svn.sourceforge.net/svnroot/PROJECTNAME/trunk
PROJECTNAME is the project UNIX name, as specified on the summary page for the project in question. The project, 'filezilla', for example, would use the following URL to checkout the trunk of their SVN repository:
https://filezilla.svn.sourceforge.net/svnroot/filezilla/trunk
Upon first connection to the SourceForge.net SVN server, you may be prompted to accept the 'server certificate' for svn.sourceforge.net, you should 'Accept Permanently' the certificate.
After initial checkout, if you change a file and want to commit the change back to the repository, you will be prompted for your username and password. This will be the username and password for the SourceForge.net website.
Example:


Integrating TortoiseSVN client on STS (subclipse)

1. Open STS  -> click on Help


2. Click ->Install New software


3. Click Add Button and screen blow is dispalyed
Name : trotoiseSvn
Location: http://subclipse.tigris.org/update_1.10.x
For further information visit
http://subclipse.tigris.org/servlets/ProjectProcess?pageID=p4wYuA


4. STS automatically downloads all the required plugins, after that restart the STS and refer to section below for the tips to operate the plugin.

Opearating  subclipse from STS

1. Right click on Project Explorer and


2. click -> Import


3. Choose SVN menu and  click -> checkout Projects for SVN  -> Next Button
4. If its first time select first option then -> Next Button
Provide the link of your SVN server  -> Next Button
i.e. my current server location is https://windows-2kj6rz/svn/

Else you are provided with list of projects from previous server setting and choose a project to work on.
5. After that following screen will be displayed, choose appropriate folder and project you want and click -> Next Button


6. If you want further setting  modify as you need, but for our purpose default is alright thus -> Finish Button


Set default selected value in struts2 select tag

Setting selected date in dojo date picker using struts2.

Add the code below in jsp file.
      <!--name attribute inside select tag must be a variable in action class with getter/setter -->  
      <!-- test variable sets the value of selected item in action class -->  
      <select name="test">  
           <!-- name attribute could be anything you want but value attribute must be a model class variable-->  
           <s:set name="lead_string_LS_ID" value="MasterDataModel.string_LS_ID" />  
                <!-- value attribute must be a list to iterate, status (an instanceof IteratorStatus will be pushed into stack upon each iteration)or result -->  
                <!-- var Name used to reference the value pushed into the Value Stack (my list contain leadSource_String_Id)-->  
                <s:iterator value="leadSource_list" status="result" var="leadSource_String_Id">  
                          <!--#lead_string_LS_ID is value taken from <set> tag above. Note # must be in-front of the name  
                               leadSource_String_Id is element specified in var of <iterator> tag       
                          -->  
                          <s:if test='(#lead_string_LS_ID.equals(leadSource_String_Id))'>  
                               <option value="<s:property value='leadSource_String_Id'/>" selected="selected">  
                                    <s:property value="leadSource_String_Name" />  
                               </option>  
                          </s:if>  
                          <s:else>  
                               <option  
                                    value="<s:property value='leadSource_String_Id'/>">  
                                    <s:property value="leadSource_String_Name" />  
                               </option>  
                          </s:else>  
                </s:iterator>  
      </select>  

Saturday, April 22, 2017

Android Form Validation

This example show how to prevent null and blank field. Here username field check whether the submitted value is null or some blank space. If the submitted value is null or blank it displays a error message. Another amount field prevent user from entering negative value in the field, it simply uses android:inputType="numberDecimal" to prevent user to enter negative value. Likewise you can limit input size with android:maxLength="20", this limits text size to 20 characters.

Click Here to download Source Code

Form Validation
Fig: Form Validation

FormValidationExampleActivity.java

 package com.rnd.action;  
 import java.util.regex.Matcher;  
 import java.util.regex.Pattern;  
 import android.app.Activity;  
 import android.os.Bundle;  
 import android.util.Log;  
 import android.view.View;  
 import android.widget.Button;  
 import android.widget.EditText;  
 import android.widget.Toast;  
 public class FormValidationExampleActivity extends Activity{  
   /** Called when the activity is first created. */  
      EditText username, amount;  
       Button btn;  
      @Override  
   public void onCreate(Bundle savedInstanceState)  
      {  
     super.onCreate(savedInstanceState);  
     setContentView(R.layout.main);  
        username = (EditText) findViewById(R.id.username);  
     amount = (EditText) findViewById(R.id.amount);  
        btn = (Button) findViewById(R.id.button1);  
     btn.setOnClickListener(new View.OnClickListener() {  
                public void onClick(View v) {  
                     Log.d("Checking value of textbox", amount.getText().toString());  
               if(formValidator(username.getText().toString()) == true)  
               {  
                    Toast.makeText(FormValidationExampleActivity.this, "Valid Data", Toast.LENGTH_LONG).show();  
               }  
               else  
               {  
                    Toast.makeText(FormValidationExampleActivity.this, "Name field is required", Toast.LENGTH_LONG).show();  
               }  
                }  
           });  
      }  
      public boolean formValidator(String values)  
      {  
           if((values.trim()).equals("") || values.equals(null))  
           {  
                return false;  
           }  
           else  
           {  
                return true;  
           }  
      }  
      public void checkemail(String email)  
      {  
        Pattern pattern = Pattern.compile(".+@.+\\.[gmail.com]+");  
        Matcher matcher = pattern.matcher(email);  
        boolean emailcheck = matcher.matches();  
      }  
 }  

Main.xml

 <?xml version="1.0" encoding="utf-8"?>  
 <LinearLayout xmlns:android="http://schemas.android.com/apk/res/android"  
   android:layout_width="fill_parent"  
   android:layout_height="fill_parent"  
   android:orientation="vertical" >  
   <TextView  
     android:layout_width="fill_parent"  
     android:layout_height="wrap_content"  
     android:text="@string/hello" />  
   <EditText  
     android:id="@+id/username"  
     android:layout_width="match_parent"  
     android:layout_height="wrap_content"  
     android:ems="10"  
      >  
     <requestFocus />  
   </EditText>  
   <EditText  
     android:id="@+id/amount"  
     android:layout_width="match_parent"  
     android:layout_height="wrap_content"  
     android:ems="10"  
     android:inputType="numberDecimal" />  
   <Button  
     android:id="@+id/button1"  
     android:layout_width="wrap_content"  
     android:layout_height="wrap_content"  
     android:text="Ok" />  
 </LinearLayout>  

Android ListView onItemClick Event

Here are the output screen of the application where users are able to insert their data through a textbox by clicking ok button as shown in image below. After adding the items users are able to select the items via clicking on it and the selected item is displayed via a toast.
Click Here to download source folder


ListExampleActivity.java

 package com.rnd.action;  
 import java.util.ArrayList;  
 import android.app.Activity;  
 import android.os.Bundle;  
 import android.util.Log;  
 import android.util.SparseBooleanArray;  
 import android.view.KeyEvent;  
 import android.view.MotionEvent;  
 import android.view.View;  
 import android.widget.AdapterView;  
 import android.widget.ArrayAdapter;  
 import android.widget.Button;  
 import android.widget.EditText;  
 import android.widget.ListView;  
 import android.widget.Toast;  
 public class ListExampleActivity extends Activity {  
   /** Called when the activity is first created. */  
   ListView lv;  
   String[] outputStrArr;  
   ArrayAdapter<String> aa = null;  
      @Override  
   public void onCreate(Bundle savedInstanceState) {  
     super.onCreate(savedInstanceState);  
     setContentView(R.layout.main);  
     lv = (ListView) findViewById(R.id.listView_user);  
     final EditText myEditText = (EditText) findViewById(R.id.myeditText);  
     final ArrayList<String> todoItems = new ArrayList<String>();  
     aa = new ArrayAdapter<String>(this, android.R.layout.simple_list_item_1,todoItems);  
     lv.setAdapter(aa);  
     myEditText.setOnKeyListener(new View.OnKeyListener() {  
                public boolean onKey(View v, int keyCode, KeyEvent event) {  
                     // TODO Auto-generated method stub  
                     if(event.getAction()== KeyEvent.ACTION_DOWN)  
                     {  
                          if(keyCode == KeyEvent.KEYCODE_DPAD_CENTER)  
                          {  
                               todoItems.add(0,myEditText.getText().toString());  
                               aa.notifyDataSetChanged();  
                               myEditText.setText("");  
                               return true;  
                          }  
                     }  
                     return false;  
                }  
           });  
     lv.setOnItemClickListener(new AdapterView.OnItemClickListener() {  
                public void onItemClick(AdapterView<?> arg0, View arg1, int arg2,  
                          long arg3) {  
                     //Log.i("Selected Item in list", arg1.toString());  
                     String test = (String) lv.getAdapter().getItem(arg2);  
                     Log.i("Selected Item in list", test);  
                     Toast.makeText(ListExampleActivity.this,test ,Toast.LENGTH_LONG);  
                }  
           });  
     }  
 }  

Main.xml

 <?xml version="1.0" encoding="utf-8"?>  
 <LinearLayout xmlns:android="http://schemas.android.com/apk/res/android"  
   android:layout_width="fill_parent"  
   android:layout_height="fill_parent"  
   android:orientation="vertical" >  
   <TextView  
     android:layout_width="fill_parent"  
     android:layout_height="wrap_content"  
     android:text="@string/hello" />  
   <EditText  
     android:id="@+id/myeditText"  
     android:layout_width="match_parent"  
     android:layout_height="wrap_content"  
     android:ems="10" >  
     <requestFocus />  
   </EditText>  
   <ListView  
     android:id="@+id/listView_user"  
     android:layout_width="match_parent"  
     android:layout_height="wrap_content"  
     android:clickable="true"   
      >  
   </ListView>  
 </LinearLayout>  


AndroidManifest.xml

 <?xml version="1.0" encoding="utf-8"?>  
 <manifest xmlns:android="http://schemas.android.com/apk/res/android"  
   package="com.rnd.action"  
   android:versionCode="1"  
   android:versionName="1.0" >  
   <uses-sdk android:minSdkVersion="8" />  
   <application  
     android:icon="@drawable/ic_launcher"  
     android:label="@string/app_name" >  
     <activity  
       android:name=".ListExampleActivity"  
       android:label="@string/app_name" >  
       <intent-filter>  
         <action android:name="android.intent.action.MAIN" />  
         <category android:name="android.intent.category.LAUNCHER" />  
       </intent-filter>  
     </activity>  
   </application>  
 </manifest>  

List with checkbox

Here are the output screen of the application where users are able to insert their data through a textbox by clicking ok button as shown in image below. After adding the items users are able to select the items via a checkbox and the selected item are only rendered back to list when the button appearing on screen is clicked. 
Android List with checkbox
Fig: Android List with checkbox


 Get Selected Item Using Checkbox in Listview when Button is clicked
Fig:

Get Selected Item Using Checkbox in Listview when Button is clicked


ListCheckboxExampleActivity.java

 package com.rnd.action;  
 import java.util.ArrayList;  
 import android.app.Activity;  
 import android.os.Bundle;  
 import android.util.Log;  
 import android.util.SparseBooleanArray;  
 import android.view.KeyEvent;  
 import android.view.View;  
 import android.widget.ArrayAdapter;  
 import android.widget.Button;  
 import android.widget.EditText;  
 import android.widget.ListView;  
 public class ListCheckboxExampleActivity extends Activity {  
   /** Called when the activity is first created. */  
   ListView lv;  
   String[] outputStrArr;  
   ArrayAdapter<String> aa = null;  
      @Override  
   public void onCreate(Bundle savedInstanceState) {  
     super.onCreate(savedInstanceState);  
     setContentView(R.layout.main);  
     lv = (ListView) findViewById(R.id.listView_user);  
     final EditText myEditText = (EditText) findViewById(R.id.myeditText);  
     final ArrayList<String> todoItems = new ArrayList<String>();  
     aa = new ArrayAdapter<String>(this, android.R.layout.simple_list_item_multiple_choice,todoItems);  
     lv.setAdapter(aa);  
     myEditText.setOnKeyListener(new View.OnKeyListener() {  
                public boolean onKey(View v, int keyCode, KeyEvent event) {  
                     // TODO Auto-generated method stub  
                     if(event.getAction()== KeyEvent.ACTION_DOWN)  
                     {  
                          if(keyCode == KeyEvent.KEYCODE_DPAD_CENTER)  
                          {  
                               todoItems.add(0,myEditText.getText().toString());  
                               aa.notifyDataSetChanged();  
                               myEditText.setText("");  
                               return true;  
                          }  
                     }  
                     return false;  
                }  
           });  
     Button btn_ok = (Button) findViewById(R.id.button_ok);  
     btn_ok.setOnClickListener(new View.OnClickListener() {  
                public void onClick(View v) {  
                     SparseBooleanArray checked = lv.getCheckedItemPositions();  
               ArrayList<String> selectedItems = new ArrayList<String>();  
               for (int i = 0; i < checked.size(); i++) {  
                 // Item position in adapter  
                 int position = checked.keyAt(i);  
                 // Add sport if it is checked i.e.) == TRUE!  
                 if (checked.valueAt(i))  
                   selectedItems.add(aa.getItem(position));        
               }  
               outputStrArr = new String[selectedItems.size()];  
               aa.clear();  
               for (int i = 0; i < selectedItems.size(); i++) {  
                 outputStrArr[i] = selectedItems.get(i);  
                 Log.i("test data" + outputStrArr[i], null, null);  
                 aa.add(selectedItems.get(i));  
               }  
                }  
           });  
   }  
 }  

main.xml

 <?xml version="1.0" encoding="utf-8"?>  
 <LinearLayout xmlns:android="http://schemas.android.com/apk/res/android"  
   android:layout_width="fill_parent"  
   android:layout_height="fill_parent"  
   android:orientation="vertical" >  
   <TextView  
     android:layout_width="fill_parent"  
     android:layout_height="wrap_content"  
     android:text="@string/hello" />  
   <EditText  
     android:id="@+id/myeditText"  
     android:layout_width="match_parent"  
     android:layout_height="wrap_content"  
     android:ems="10" >  
     <requestFocus />  
   </EditText>  
   <ListView  
     android:id="@+id/listView_user"  
     android:layout_width="match_parent"  
     android:layout_height="wrap_content"  
     android:choiceMode="multipleChoice"  
      >  
   </ListView>  
   <Button  
     android:id="@+id/button_ok"  
     android:layout_width="wrap_content"  
     android:layout_height="wrap_content"  
     android:text="Button" />  
 </LinearLayout>  

AndroidManifest.xml

 <?xml version="1.0" encoding="utf-8"?>  
 <manifest xmlns:android="http://schemas.android.com/apk/res/android"  
   package="com.rnd.action"  
   android:versionCode="1"  
   android:versionName="1.0" >  
   <uses-sdk android:minSdkVersion="8" />  
   <application  
     android:icon="@drawable/ic_launcher"  
     android:label="@string/app_name" >  
     <activity  
       android:name=".ListCheckboxExampleActivity"  
       android:label="@string/app_name" >  
       <intent-filter>  
         <action android:name="android.intent.action.MAIN" />  
         <category android:name="android.intent.category.LAUNCHER" />  
       </intent-filter>  
     </activity>  
   </application>  
 </manifest>  

Connecting Android with Php web service


In the sample tutorial below a simple login form is presented to user which is used to connect to php web service to validate user via Json.
You can download project, php web service and database. Click here to download

Application Interface

Login Screen (JsonParseExampleActivity)


MainMenuActivity (Success screen)

JsonParseExampleActivity.Class (Login Activity)

 package com.rnd.android;  
 import java.util.ArrayList;  
 import java.util.List;  
 import org.apache.http.NameValuePair;  
 import org.apache.http.message.BasicNameValuePair;  
 import org.json.JSONException;  
 import org.json.JSONObject;  
 import android.app.Activity;  
 import android.app.ProgressDialog;  
 import android.content.Intent;  
 import android.os.AsyncTask;  
 import android.os.Bundle;  
 import android.util.Log;  
 import android.view.View;  
 import android.widget.Button;  
 import android.widget.EditText;  
 import android.widget.Toast;  
 import com.rnd.service.JsonParseClass;  
 public class JsonParseExampleActivity extends Activity {  
      private ProgressDialog pDialog;  
      private final String LOG_MSG = "Log tracing";  
      JsonParseClass jsonParse = new JsonParseClass();  
      String successTag = null;  
      private static final String connectingUrl = "http://10.0.2.2/rnd_webservice/webservice.php";  
      private static final String TAG_SUCCESS = "success";  
      EditText edittextUsername, edittextPassword;  
      Button buttonLogin;  
      /** Called when the activity is first created. */  
      @Override  
      public void onCreate(Bundle savedInstanceState) {  
           super.onCreate(savedInstanceState);  
           setContentView(R.layout.login);  
           edittextUsername = (EditText) findViewById(R.id.editText_username);  
           edittextPassword = (EditText) findViewById(R.id.editText_password);  
           buttonLogin = (Button) findViewById(R.id.Login);  
           buttonLogin.setOnClickListener(new View.OnClickListener() {  
                public void onClick(View v) {  
                     // TODO Auto-generated method stub  
                     ValidateUser validateUser = new ValidateUser();  
                     validateUser.execute();  
                }  
           });  
      }  
      // inner class  
      public class ValidateUser extends AsyncTask<String, String, String> {  
           ProgressDialog progressDialog;  
           JSONObject jObject;  
           @Override  
           protected void onPreExecute() {  
                // TODO Auto-generated method stub  
                super.onPreExecute();  
                progressDialog = new ProgressDialog(JsonParseExampleActivity.this);  
                progressDialog.setMessage("Logining please wait ...");  
                progressDialog.setIndeterminate(false);  
                progressDialog.setCancelable(true);  
                progressDialog.show();  
           }  
           @Override  
           protected String doInBackground(String... params) {  
                // TODO Auto-generated method stub  
                String username = edittextUsername.getText().toString().trim();  
                String password = edittextPassword.getText().toString().trim();  
                Log.d(LOG_MSG, "user name " + username);  
                List<NameValuePair> validateParams = new ArrayList<NameValuePair>();  
                validateParams.add(new BasicNameValuePair("username", username));  
                validateParams.add(new BasicNameValuePair("password", password));  
                System.out.println("before calling json object");  
                jObject = jsonParse.makeHttpRequest(connectingUrl, "POST",  
                          validateParams);  
                try {  
                     successTag = jObject.getString(TAG_SUCCESS);  
                     Log.d("Jeson result ", successTag);  
                } catch (JSONException e) {  
                     // TODO Auto-generated catch block  
                     e.printStackTrace();  
                }  
                return successTag;  
           }  
           @Override  
           protected void onPostExecute(String result) {  
                progressDialog.dismiss();  
                // TODO Auto-generated method stub  
                super.onPostExecute(result);  
                Log.d("Checking the result a post execute", result);  
                if (successTag.equalsIgnoreCase("1")) {  
                     Toast.makeText(JsonParseExampleActivity.this, "valid user",  
                               Toast.LENGTH_SHORT).show();  
                     Intent intent = new Intent(JsonParseExampleActivity.this,  
                               MainMenu.class);  
                     startActivity(intent);  
                } else {  
                     Toast.makeText(JsonParseExampleActivity.this, " invalid user",  
                               Toast.LENGTH_LONG).show();  
                }  
           }  
      }  
 }  

JsonParserClass.Class

 package com.rnd.service;  
 import java.io.BufferedReader;  
 import java.io.IOException;  
 import java.io.InputStream;  
 import java.io.InputStreamReader;  
 import java.io.UnsupportedEncodingException;  
 import java.util.List;  
 import org.apache.http.HttpEntity;  
 import org.apache.http.HttpResponse;  
 import org.apache.http.NameValuePair;  
 import org.apache.http.client.ClientProtocolException;  
 import org.apache.http.client.entity.UrlEncodedFormEntity;  
 import org.apache.http.client.methods.HttpPost;  
 import org.apache.http.impl.client.DefaultHttpClient;  
 import org.json.JSONException;  
 import org.json.JSONObject;  
 import android.util.Log;  
 public class JsonParseClass {  
      DefaultHttpClient httpClient;  
      HttpPost httpPost;  
      HttpResponse httpResponse;  
      HttpEntity httpEntity;  
      static InputStream inputStream = null;  
      static JSONObject jsonObject = null;  
      static String jsonString = "";  
      public JSONObject makeHttpRequest(String url, String method,  
                List<NameValuePair> params)   
      {  
                try   
                {  
                     if(method == "POST")  
                     {  
                          //getting default http client to make request  
                          httpClient = new DefaultHttpClient();  
                          //creating http post request to the given url  
                          httpPost = new HttpPost(url);  
                     //setting inputs of android as html form inputs  
                     httpPost.setEntity(new UrlEncodedFormEntity(params));  
                     //execute http post request throuh response object with httpclient object  
                     httpResponse = httpClient.execute(httpPost);  
                     //getting entity object from response object  
                     httpEntity = httpResponse.getEntity();  
                     //getting contents of httpentity into inputstream  
                     inputStream = httpEntity.getContent();  
                     }  
                }  
                catch (UnsupportedEncodingException e) {  
                     // TODO Auto-generated catch block  
                     e.printStackTrace();  
                     System.out.println(e.toString());  
                } catch (ClientProtocolException e) {  
                     // TODO Auto-generated catch block  
                     e.printStackTrace();  
                     System.out.println(e.toString());  
                } catch (IOException e) {  
                     // TODO Auto-generated catch block  
                     e.printStackTrace();  
                     System.out.println(e.toString());  
                }  
                //GETTING BUFFERREADER TO READ INPUT STREAM       
                try {  
                     BufferedReader bufferReader = new BufferedReader(new InputStreamReader(inputStream, "iso-8859-1"),8);  
                     StringBuilder sb = new StringBuilder();  
                     String line = null;  
                     while ((line = bufferReader.readLine()) != null) {  
                          sb.append(line +"\n");  
                     }  
                     inputStream.close();  
                     jsonString = sb.toString();  
                } catch (UnsupportedEncodingException e) {  
                     // TODO Auto-generated catch block  
                     e.printStackTrace();  
                     Log.e("Buffer Error", "Error converting result " + e.toString());  
                } catch (IOException e) {  
                     // TODO Auto-generated catch block  
                     e.printStackTrace();  
                }       
                //parse the string to json object  
                try {  
                     jsonObject = new JSONObject(jsonString);  
                } catch (JSONException e) {  
                     // TODO Auto-generated catch block  
                     e.printStackTrace();  
                      Log.e("JSON Parser", "Error parsing data [" + e.getMessage()+"] "+ jsonString);  
                }  
           return jsonObject;  
      }  
 }  

MainMenu.Class

 package com.rnd.android;  
 import android.app.Activity;  
 import android.os.Bundle;  
 public class MainMenu extends Activity {  
      @Override  
      protected void onCreate(Bundle savedInstanceState) {  
           // TODO Auto-generated method stub  
           super.onCreate(savedInstanceState);  
           setContentView(R.layout.main);  
      }  
 }  

AndroidManifest.xml

 <?xml version="1.0" encoding="utf-8"?>  
 <manifest xmlns:android="http://schemas.android.com/apk/res/android"  
   package="com.rnd.android"  
   android:versionCode="1"  
   android:versionName="1.0" >  
   <uses-sdk android:minSdkVersion="8" />  
   <uses-permission android:name="android.permission.INTERNET"/>  
   <application  
     android:icon="@drawable/ic_launcher"  
     android:label="@string/app_name" >  
     <activity  
       android:name=".JsonParseExampleActivity"  
       android:label="@string/app_name" >  
       <intent-filter>  
         <action android:name="android.intent.action.MAIN" />  
         <category android:name="android.intent.category.LAUNCHER" />  
       </intent-filter>  
     </activity>  
     <activity android:name="MainMenu"></activity>  
   </application>  
 </manifest>  

layout/login.xml

 <?xml version="1.0" encoding="utf-8"?>  
 <LinearLayout xmlns:android="http://schemas.android.com/apk/res/android"  
   android:layout_width="match_parent"  
   android:layout_height="match_parent"  
   android:orientation="vertical" >  
   <TextView  
     android:id="@+id/textView1"  
     android:layout_width="wrap_content"  
     android:layout_height="wrap_content"  
     android:text="Username"  
     android:textAppearance="?android:attr/textAppearanceLarge" />  
   <EditText  
     android:id="@+id/editText_username"  
     android:layout_width="match_parent"  
     android:layout_height="wrap_content"  
     android:ems="10" >  
     <requestFocus />  
   </EditText>  
   <TextView  
     android:id="@+id/textView2"  
     android:layout_width="wrap_content"  
     android:layout_height="wrap_content"  
     android:text="Password"  
     android:textAppearance="?android:attr/textAppearanceLarge" />  
   <EditText  
     android:id="@+id/editText_password"  
     android:layout_width="match_parent"  
     android:layout_height="wrap_content"  
     android:ems="10"  
     android:inputType="textPassword" />  
   <Button  
     android:id="@+id/Login"  
     android:layout_width="match_parent"  
     android:layout_height="wrap_content"  
     android:text="Login" />  
 </LinearLayout>  

layout/main.xml

 <?xml version="1.0" encoding="utf-8"?>  
 <LinearLayout xmlns:android="http://schemas.android.com/apk/res/android"  
   android:layout_width="fill_parent"  
   android:layout_height="fill_parent"  
   android:orientation="vertical" >  
   <TextView  
     android:layout_width="fill_parent"  
     android:layout_height="wrap_content"  
     android:text="@string/hello" />  
   <ImageView  
     android:id="@+id/imageView2"  
     android:layout_width="220dp"  
     android:layout_height="wrap_content"  
     android:layout_weight="0.19"  
     android:src="@drawable/ic_launcher" />  
   <ImageView  
     android:id="@+id/imageView1"  
     android:layout_width="212dp"  
     android:layout_height="wrap_content"  
     android:layout_weight="0.39"  
     android:src="@drawable/ic_launcher" />  
 </LinearLayout>  

 Php web service file

 <?php  
           // array for JSON response  
           $response = array();  
      if(isset($_POST['username']) And isset($_POST['password']))  
      {  
                $un=$_POST['username'];  
                $pw=$_POST['password'];  
                //connect to the db  
                $host="localhost"; // Host name   
                $user="root"; // Mysql username   
                $pswd=""; // Mysql password   
                $db="rnd_android"; // Database name   
                $tbl_name="user"; // Table name  
                $conn = mysql_connect($host, $user, $pswd);  
                mysql_select_db($db, $conn);  
                //run the query to search for the username and password the match  
                //$query = "SELECT * FROM $tbl_name WHERE first_name = '$un' AND password = '$pw'";  
                $query = "SELECT user_id FROM $tbl_name WHERE user_name = '$un' AND password = '$pw'";  
                $result = mysql_query($query) or die("Unable to verify user because : " . mysql_error());  
                //this is where the actual verification happens  
                if(mysql_num_rows($result) > 0)  
                {  
                     // success  
                     $response["success"] = 1;  
                     // echoing JSON response  
                     echo json_encode($response);  
                     //echo mysql_result($result,0); // for correct login response  
                }                 
                else  
                {  
                     //echo 0; // for incorrect login response  
                     // no products found  
                     $response["success"] = 0;  
                     // echo no users JSON  
                     echo json_encode($response);  
                }  
      }  
      else  
      {  
                echo("no paramter found");  
      }  
 ?>  

Creating date picker using dojo

In this tutorial I am going to use dojo plugin for date picker with struts 2.

Web.xml
Adding filters to map request to struts front controller.

 <?xml version="1.0" encoding="UTF-8"?>  
 <web-app xmlns:xsi="http://www.w3.org/2001/XMLSchema-instance" xmlns="http://java.sun.com/xml/ns/javaee" xmlns:web="http://java.sun.com/xml/ns/javaee/web-app_2_5.xsd" xsi:schemaLocation="http://java.sun.com/xml/ns/javaee http://java.sun.com/xml/ns/javaee/web-app_3_0.xsd" id="WebApp_ID" version="3.0">  
  <display-name>Validationv2</display-name>  
  <welcome-file-list>  
   <welcome-file>index.html</welcome-file>  
   <welcome-file>index.htm</welcome-file>  
   <welcome-file>index.jsp</welcome-file>  
   <welcome-file>default.html</welcome-file>  
   <welcome-file>default.htm</welcome-file>  
   <welcome-file>default.jsp</welcome-file>  
  </welcome-file-list>  
   <filter>  
  <filter-name>struts2</filter-name>  
  <filter-class> org.apache.struts2.dispatcher.ng.filter.StrutsPrepareAndExecuteFilter</filter-class>  
  </filter>  
  <filter-mapping>  
  <filter-name>struts2</filter-name>  
  <url-pattern>/*</url-pattern>  
  </filter-mapping>  
 </web-app>  

jsp file
 %@ page language="java" contentType="text/html; charset=ISO-8859-1"  
   pageEncoding="ISO-8859-1"%>  
   <%@ taglib prefix="s" uri="/struts-tags"%>  
   <%@ taglib prefix="sx" uri="/struts-dojo-tags"%>  
 <!DOCTYPE html PUBLIC "-//W3C//DTD HTML 4.01 Transitional//EN" "http://www.w3.org/TR/html4/loose.dtd">  
 <html>  
 <head>  
 <meta http-equiv="Content-Type" content="text/html; charset=ISO-8859-1">  
 <title>Insert title here</title>  
 <sx:head />  
 </head>  
 <body>  
 <s:form action="DateTimePicker" method="POST">  
 <sx:datetimepicker name="todayDate" label="Format (yyyy-MM-dd)" displayFormat="yyyy-MM-dd"/>  
 </s:form>  
 </body>  
 </html>  

DateBean class

 DateBean (Action Class)  
 package com.pkg.actions;  
 import java.util.Date;  
 import com.opensymphony.xwork2.ActionSupport;  
 public class DeatBean extends ActionSupport{  
      private Date todayDate;  
      public String execute() throws Exception {  
      setTodayDate(new Date());  
      return SUCCESS;  
      }  
      public Date getTodayDate() {  
          return todayDate;  
          }  
      public void setTodayDate(Date value) {  
          todayDate = value;  
          }  
 }  

xml action mapping
 <?xml version="1.0" encoding="UTF-8"?>  
 <!DOCTYPE struts PUBLIC  
 "-//Apache Software Foundation//DTD Struts Configuration 2.0//EN"  
 "http://struts.apache.org/dtds/struts-2.0.dtd">  
 <struts>  
 <package name="defalut" extends="struts-default">  
 <action name="DateTimePicker" class="com.pkg.actions.DateBean">  
 <result>/datepicker.jsp</result>  
 </action>  
 </package>  
 </struts>  

SQL INTERVIEW QUESTIONS AND ANSWERS